Difference between revisions of "Creating a Contact"
Jump to navigation
Jump to search
imported>Sartainm (Created page with "Give your contact a name, select whether or not the contact is to be enabled upon completion, and make the alert level selection. Defining levels allows the contact to be noti...") |
imported>Sartainm |
||
| (2 intermediate revisions by the same user not shown) | |||
| Line 1: | Line 1: | ||
| − | Give your contact a name, select whether or not the contact is to be enabled upon completion, and make the alert level selection. | + | __NOTITLE__ |
| − | Defining levels allows the contact to be notified of Alarms that the | + | |
| − | device triggers. Each alarm has a level assigned to it. Select which | + | = Creating a Contact = |
| − | levels the contact is to be notified of when alarms matching the criteria are triggered. | + | |
| − | + | <pre> | |
| − | [[File:Createcontact.png]] | + | Give your contact a name, select whether or not the contact is to be enabled upon completion, |
| − | <br>< | + | and make the alert level selection. Defining levels allows the contact to be notified of Alarms that the |
| − | Choose your time zone, select DST(Daylight savings time) if you want to use it and choose your start and stop hours. This will determine the window in which the contact is to be notified. Finally, select your email options. These options represent the pieces of data within the email notification sent to the contact. Keep in mind that in order to add an email to the contact, you must | + | device triggers. Each alarm has a level assigned to it. Select which levels the contact is to |
| + | be notified of when alarms matching the criteria are triggered. </pre> | ||
| + | [[File:Createcontact.png|link=]]<br> | ||
| + | <pre>Choose your time zone, select DST(Daylight savings time) if you want to use it and choose | ||
| + | your start and stop hours. This will determine the window in which the contact is to be notified. | ||
| + | Finally, select your email options. These options represent the pieces of data within the email | ||
| + | notification sent to the contact. Keep in mind that in order to add an email to the contact, you must | ||
apply your changes. Repeat this process to add as many emails to the contact as you choose. | apply your changes. Repeat this process to add as many emails to the contact as you choose. | ||
| + | </pre> | ||
Latest revision as of 18:58, 14 May 2013
__NOTITLE__
Creating a Contact
Give your contact a name, select whether or not the contact is to be enabled upon completion,
and make the alert level selection. Defining levels allows the contact to be notified of Alarms that the
device triggers. Each alarm has a level assigned to it. Select which levels the contact is to
be notified of when alarms matching the criteria are triggered.
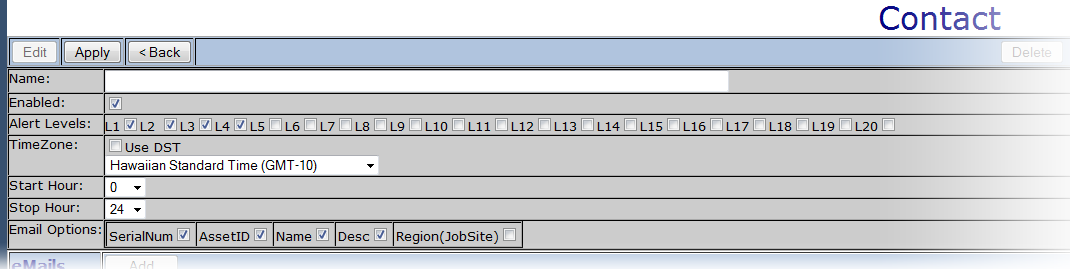
Choose your time zone, select DST(Daylight savings time) if you want to use it and choose
your start and stop hours. This will determine the window in which the contact is to be notified.
Finally, select your email options. These options represent the pieces of data within the email
notification sent to the contact. Keep in mind that in order to add an email to the contact, you must
apply your changes. Repeat this process to add as many emails to the contact as you choose.