Difference between revisions of "Map Navigation"
Jump to navigation
Jump to search
imported>Dpltech (→Create New Region) |
|||
| Line 1: | Line 1: | ||
| − | |||
= Map Navigation = | = Map Navigation = | ||
Latest revision as of 17:57, 6 June 2019
Contents
When the map is invoked a new browser tab or window is opened and the title of the page indicates the serial number of the device or the number of equipment if there are more than one .
Basic Map Features

- A. Equipment Locations Tab
- Displays equipment locations and info. You can choose what information will be displayed from Admin > Options > Asset Tracking. See Asset Tracking. The subsequent tabs show region types, for example, the typical 'JobSite' region type.
- B. Region Type Tab
- Displays all regions of that type. See Region Type Tab section.
- C. Tracking Options Setting
-
- D. Hide/Show Data Panel button
- E. Dashboard Icon
- Opens the Equipment Management page.
- F. Equipment Information Icon
- Shows additional information on the equipment at the time of the reported location.

- G. Region
- See Create New Region, Edit Region section.
- H. Equipment
- Displayed as an icon or else a colored circle. The color of the circle can be changed with the color-picker.
- By clicking an equipment icon or circle, the location information is displayed.


- I. Auto-Fetch Controls
- By default, when the map is invoked for last known locations (versus historical locations) it will continue to load new points as they become available to the system. The map will check for new points every 60 seconds or instantly upon clicking the refresh icon. Note that this does not force the device to send a new GPS location, it simply checks the database to see if a new point has arrived. The pause button may be used to stop the 60 second auto fetch. Once paused (the pause button changes to a play button) another click will resume fetching for new points every 60 seconds.
Region Type Tab

- A. Region Type Options Setting
- When 'Allow child override' is checked, the color of a region type will be overridden by the color of a region.

- B. Create New Region
- See Create New Region.
- C. Equipment list
- Shows a list of equipment in the region.

- D. Edit Region
- See Edit Region.
- E. Region Options
- Allows selection of region color.

Create New Region
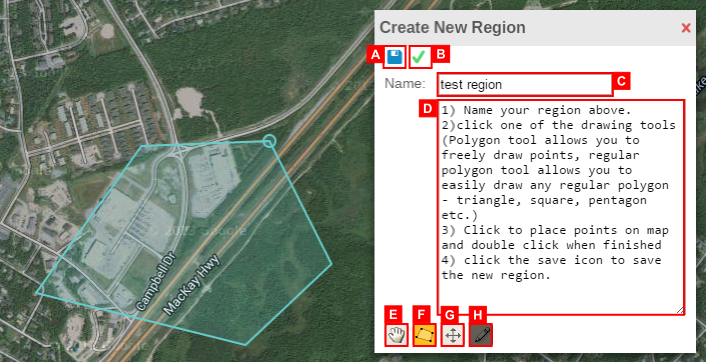
- A. Save Icon
- Click to save changes to the region. This will close the editing session and the map will automatically update with the newly defined region. Saving will save changes to the polygon itself and the region's name. Note that if you change the textual description without clicking the apply button, the textual definition is saved and may not match what is displayed.
- B. Apply Icon
- Used to update the editing object (shown in blue) on the map. This does not save the object, just updates the display to match the textual definition.
- C. Region Name
- D. The WKT (Well-Known Text) Region Specification
- After a user finishes drawing a region using polygon drawing tools, this text box will be updated to WKT. You may directly modify/define the region's definition here. If you do modify this definition you must press the apply icon (B) for the visual representation to change on the map.
- E. Navigation Control
- Allows user to return to normal navigation mode without cancelling the editing session. This is useful if you want to pan or zoom then return to editing.
- F. Polygon Drawing Tool
- When activated each click on the map will add a vertex, double-clicking will connect the current point to the first completing the polygon. On completion of drawing a polygon with this tool, the WKT syntax (D) will be updated to include the new polygon.
- G. Regular Polygon Drawing Tool
- Similar to (F) but draws a regular polygon (equilateral triangle, square, pentagon, hexagon, etc.) with the specified number of sides. To specify the number of sides, hover over the control (defaults to 4).
- H. Editing Control
- Only enabled once a polygon is present. Used to re-enter editing mode after using the navigation control. Click on this control then on your polygon. Also used to set editing options. By default the editing mode is vertex mode, but by hovering over this control you may change the mode to any combination of scaling and rotation and dragging. To return to normal mode uncheck the rotation, scale and drag options.

Edit Region

- A. Vertex
- Corresponds to a longitude/latitude pair in the WKT definition. In normal editing mode you can move vertices by simply dragging them.
- B. Edge
- An unshaded handle is shown on every edge, if you drag this handle it will add a vertex to your polygon. Using this technique you can easily create very complex polygons.
- You may use the editing tools to rotate, re-size or drag a polygon.
- You may use the editing tools to rotate, re-size or drag a polygon.

- Note that the WKT definition is updated in the image below.

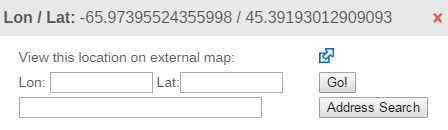
Search Location
- Right-clicking mouse on the map will show you a pair of longitude and latitude of the map position you right-clicked. You can search any location using longitude and latitude, or address.