Difference between revisions of "Templates"
imported>Dpltech (→Templates) |
imported>Dpltech (→Templates) |
||
| Line 3: | Line 3: | ||
= Templates = | = Templates = | ||
| − | |||
| − | |||
| − | |||
| − | |||
| − | |||
Templates allow you to define which set of parameters the device will listen for and report on. | Templates allow you to define which set of parameters the device will listen for and report on. | ||
This includes; Values, Alarms, Locations and Tasks. | This includes; Values, Alarms, Locations and Tasks. | ||
To navigate to the Templates section, under Admin, select Templates. | To navigate to the Templates section, under Admin, select Templates. | ||
| − | |||
| − | |||
| − | |||
This will display all available templates that you have created. | This will display all available templates that you have created. | ||
To configure/edit any of the existing templates, click the Config button | To configure/edit any of the existing templates, click the Config button | ||
| − | next the to template you wish to modify. | + | next the to template you wish to modify. |
| + | |||
| + | [[File:Templateoverview.png]] | ||
| + | |||
| + | |||
| + | |||
| + | |||
| − | |||
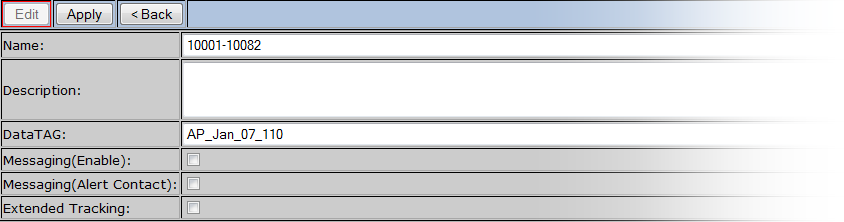
In order modify the templates you can click the Edit button at the top of the screen. | In order modify the templates you can click the Edit button at the top of the screen. | ||
This will allow you to change such values as the templates' name, description, DataTag, etc.</pre> | This will allow you to change such values as the templates' name, description, DataTag, etc.</pre> | ||
[[File:templates4.png|link=]] | [[File:templates4.png|link=]] | ||
| − | |||
| − | |||
| − | |||
| − | + | ||
This activates the ability to modify the parameters' properties. | This activates the ability to modify the parameters' properties. | ||
Click the green or red buttons to enable/disable the item, respectively. | Click the green or red buttons to enable/disable the item, respectively. | ||
You can change its name, description, options, etc. You can also delete the parameter by selecting the red X on the far right.</pre> | You can change its name, description, options, etc. You can also delete the parameter by selecting the red X on the far right.</pre> | ||
[[File:templates3.png]] | [[File:templates3.png]] | ||
| + | |||
| + | = Values = | ||
| + | |||
| + | <pre>In order to add a Value Parameter, select the Add button within the Values row. | ||
| + | This brings you to the Enter Value Params screen. | ||
| + | Enter the corresponding number(#) that you wish to reference and provide a name for your new value parameter. | ||
| + | |||
| + | You have a number of configurable options you can set: | ||
| + | </pre> | ||
| + | |||
| + | ;Alert Contact: If you would like the contact assigned to the device to be notified. | ||
| + | ;IsCounter: If you would like the value to increment on each time it gets triggered. | ||
| + | ;No Fix: . | ||
| + | ;Use Formula to enter initial value: Exactly as said, utilizes a formula for the initial value. | ||
| + | |||
| + | <pre> | ||
| + | Provide the new Value param with a Datatag and description and you're done! | ||
| + | </pre> | ||
| + | |||
| + | = Alarms = | ||
| + | |||
| + | <pre> | ||
| + | In order to add an Alarm Parameter, select the Add button within the Alarms row. | ||
| + | This brings you to the Enter Alarm Parameter screen. | ||
| + | Enter the corresponding number(#) that you wish to reference and provide a name for your new alarm parameter. | ||
| + | </pre> | ||
| + | |||
| + | ;Alert Contact: If you would like the contact assigned to the device to be notified. | ||
| + | |||
| + | <pre>Provide the new Value param with a Datatag and description and you're done! </pre> | ||
| + | |||
| + | = Locations = | ||
| + | |||
| + | In order to add a Location Parameter, select the Add button within the Location row. This brings you to the Enter Location Parameters screen. Enter the corresponding number(#) that you wish to reference and provide a name for your new location parameter Select the checkbox if you want to alert the contact when the parameter is triggered, provide the new Value param with a Datatag and description and you're done! | ||
| + | |||
| + | = Actions = | ||
| + | |||
| + | In order to add a Task Parameter, select the Add button within the Tasks row. This brings you to the Enter Task Parameters screen. Enter the corresponding number(#) that you wish to reference and provide a name for your new task parameter. Select the checkbox if you want to alert the contact when the parameter is triggered, provide the new Task parameter with a Datatag and description and you're done! | ||
Revision as of 18:50, 8 June 2015
__NOTITLE__
Contents
Templates
Templates allow you to define which set of parameters the device will listen for and report on. This includes; Values, Alarms, Locations and Tasks. To navigate to the Templates section, under Admin, select Templates.
This will display all available templates that you have created. To configure/edit any of the existing templates, click the Config button next the to template you wish to modify.
In order modify the templates you can click the Edit button at the top of the screen.
This will allow you to change such values as the templates' name, description, DataTag, etc.
This activates the ability to modify the parameters' properties. Click the green or red buttons to enable/disable the item, respectively.
You can change its name, description, options, etc. You can also delete the parameter by selecting the red X on the far right.

Values
In order to add a Value Parameter, select the Add button within the Values row.
This brings you to the Enter Value Params screen.
Enter the corresponding number(#) that you wish to reference and provide a name for your new value parameter.

You have a number of configurable options you can set:
- Alert Contact
- If you would like the contact assigned to the device to be notified.
- IsCounter
- If you would like the value to increment on each time it gets triggered.
- No Fix
- .
- Use Formula to enter initial value
- Exactly as said, utilizes a formula for the initial value.
Provide the new Value param with a Datatag and description and you're done!
Alarms
In order to add an Alarm Parameter, select the Add button within the Alarms row.
This brings you to the Enter Alarm Parameter screen.
Enter the corresponding number(#) that you wish to reference and provide a name for your new alarm parameter.
- Alert Contact
- If you would like the contact assigned to the device to be notified.
Provide the new Value param with a Datatag and description and you're done!
Locations
In order to add a Location Parameter, select the Add button within the Location row. This brings you to the Enter Location Parameters screen. Enter the corresponding number(#) that you wish to reference and provide a name for your new location parameter Select the checkbox if you want to alert the contact when the parameter is triggered, provide the new Value param with a Datatag and description and you're done!
Actions
In order to add a Task Parameter, select the Add button within the Tasks row. This brings you to the Enter Task Parameters screen. Enter the corresponding number(#) that you wish to reference and provide a name for your new task parameter. Select the checkbox if you want to alert the contact when the parameter is triggered, provide the new Task parameter with a Datatag and description and you're done!