Templates
Templates allow you to define which set of parameters the device will listen for and report on. This includes; Values, Alarms, Locations and Actions.
To navigate to the Templates section, under Admin, select Templates.
This will display all available templates that you have created. To configure/edit any of the existing templates, click the Config button next the to template you wish to modify.

- A. Modify Button
- This will allow you to change values such as the templates' name, description, datatag, etc. Click on the green check mark to save your changes or the red X to cancel.
- B. Messaging(Alert Contact)
- If this check box is unchecked, the system will ignore the 'Alert Contact' check box of child parameters and a user won't get any email alerts.
- C. App Class
- The type of application the equipment is used for. This determines which mobile app the device is visible in (Currently: amslink, atmlink, and boatlink).
- D. Toggle View Button
- Switch the view to Tab view or Stacked view.
- E. Expandable Menu
- Add new rows from here.
- F. Edit Icon
- Puts a row in edit mode.

- Click the green check mark to save or or red X buttons to cancel changes. The red trash icon on the far right deletes the row.
- G. Swap Parameter Position Icon
- Changes the display position of parameters on the equipment management page.
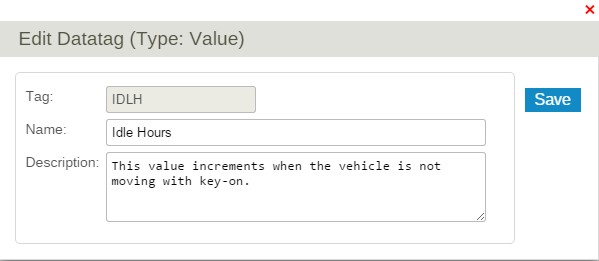
- H. Edit Datatag
- Datatags have names and descriptions that are used when the name and description is left empty on a row. Datatag names and descriptions are company wide. Changing them changes the name on all rows that don't have their own name and description and that use the datatag. Datatag names have been pre-populated with the most common names from the rows that were using those datatags.


Contents
Values
In order to add a Value Parameter, click the New button from the expandable menu of the Values tab. This brings you to the Enter Value Params screen shown below.

There are a number of configurable options:
- A. Value #
- DPL devices internally identify types of values by their value num. The value definitions created here are used to configure the rest of the parameters such as names, descriptions etc, tied to these value nums. There cannot be any duplicate value nums in a set of configuration rows of a template.
- B. Tag
- A datatag. Only allows the uppercase alphabets, number, '_' or '%'.
- C. Name
- Leave empty to use the datatag name.
- D. Description
- Leave empty to use the datatag description.
- E. Optional Formula
- Pre-defined formulas to convert the raw data to a particular format.
- F. Extra Formula
- Extra mathematical formula. When there is an optional formula, the extra formula will be applied after executing the optional formula (Subject to the condition the optional formula output is numeric).
- G. Alert Contact
- Send e-mails when a value comes in to configured alert recipient (Configured in Accounts).
- H. IsCounter
- If this is set, the value is continuously incremented (unless a manual data reset or initial install is performed). The value is corrected for downward jumps caused be hardware resets.
- I. No Fix
- If set, the value won't be reset to zero on data reset. For further details, see Fix Data.
- J. Use Formula to enter initial value
- If set, the Optional Formula will be used to convert the initial value to a raw value.
- K. Resets on Power Cycle
- The data will be reset on power cycle if this is checked.
- L. Ignore Zeros
- M. Admin Only
- Not visible to normal users.
- N. Location Special Data Type
Alarms
In order to add an Alarm Parameter, click the New button from the expandable menu of the Alarms tab. This brings you to the Enter Alarm Parameter screen as below.

There are a number of configurable options:
- A. Alarm #
- DPL devices internally identify types of alarms by their alarm num. The alarm definitions created here are used to configure the rest of the parameters such as names, descriptions etc, tied to these alarm nums. There cannot be any duplicate alarm nums in a set of configuration rows of a template.
- B. Tag
- A datatag. Only allows the uppercase alphabets, number, '_' or '%'.
- C. Name
- Leave empty to use the datatag name.
- D. Description
- Leave empty to use the datatag description.
- E. Alert Contact
- Send e-mails when a value comes in to configured alert recipient (Configured in Accounts).
- F. Display Level
- A selected display level will be shown as 'Alarm Level' on Alarms reports. See Alarms. (Possible display levels: Critical, High, Maintenance, Medium, Sleep, Low, Normal, and Hidden.)
- G. Alert Level
- .
- H. Alarm Group
- .
Locations
In order to add a Location Parameter, click the New button from the expandable menu of the Locations tab. This brings you to the Enter Location Parameters screen. Enter the corresponding number(#) that you wish to reference and provide a name for your new location parameter Select the 'Alert Contact' check box if you want to alert the contact when the parameter is triggered, provide the new value param with a datatag and description and you're done!
Actions
In order to add a Action Parameter, click the New button from the expandable menu of the Actions tab. This brings you to the Enter Action Parameters screen. Enter the corresponding number(#) that you wish to reference and provide a name for your new action parameter. Select the 'Alert Contact' check box if you want to alert the contact when the parameter is triggered, provide the new action parameter with a datatag and description and you're done!
Settings
In order to add a Setting Parameter, click the New Setting button from the expandable menu of the Setting tab. This brings you to the Enter Setting Parameters screen. Provide a name and description and you're done!